Featured

Jupyter notebook / Lab doesn’t open

wrote error: ‘Schema not found’

You have installed Python3 via homebrew, and you installed jupyterlab, and when you try opening jupyter notebook, you run into errors – such as command not found, or even if it opens, then you only see the directory, but not the ability to create / run a notebook.

This seems to be a know issue with brew, with Apple Chip Mac/os.

Some of the commands (after looked through couple discussion on the issue) that I ran, in the below order, that fixed the issue for me.

brew install jupyterlab
jupyter lab build
brew update
brew doctor
brew link --overwrite jupyterlab

After which, I was able to execute jupyter notebook or jupyter lab without any issues.
See if this helps you.

gitpython modules GitCommandError and Repo import error

You have installed gitpython using pip install gitypython in Mac.

And now you try importing the modules (from git.exc import GitCommandError or from git import Repo) that work with git repository, but then you run into the below error

>>> from git.exc import GitCommandError
Traceback (most recent call last):
File “”, line 1, in
File “/usr/local/lib/python2.7/site-packages/git/__init__.py”, line 33, in
_init_externals()
File “/usr/local/lib/python2.7/site-packages/git/__init__.py”, line 27, in _init_externals
raise ImportError(“‘gitdb’ could not be found in your PYTHONPATH”)
ImportError: ‘gitdb’ could not be found in your PYTHONPATH

If you have installed python using ‘brew install python’ or ‘brew install python@2’, then it install pip for you, as well as when you did gitpython, it would have added the gitdb. It’s seems that the folder /usr/local/sbin wasn’t in my PATH ( link ), so after I added it to my .bash_profile (PATH=$PATH:/usr/local/sbin) and ran ‘source bash_profile’, I was able to import the above modules.

Hope this helps.

ebates promo.png

Google sheet python API modules failing to install using pip

If you have tried to Install the Google Client Library, for Python in Mac, and running into error, see if the below solves the issue.

Original command documented in Google:

pip install --upgrade google-api-python-client google-auth-httplib2 google-auth-oauthlib

Error: Cannot uninstall ‘six’. It is a distutils installed project and thus we cannot accurately determine which files belong to it which would lead to only a partial uninstall.

Modify the above command to exclude the check for already installed package ‘six’

Modified command:

pip install --upgrade google-api-python-client google-auth-httplib2 google-auth-oauthlib --ignore-installed six

Hope this helps.

ebates promo.png

Git Config and Git Alias

Where to find git config file in Mac:

In Mac, you can usually find the Git config file in your home directory, in hidden file .gitconfig

eg., /Users/.gitconfig

How to Add alias(aliases) to Git config file:

You can add Aliases for GIT commands (a single command or a series of commands) for your convenience (easy to remember or fewer keyboard strokes)

Couple ways to add alias to the config file:

    1. Add using git config command: eg., here is to add alias to find the Last commit to the branch you are on.
      git config --global alias.last 'log -1 HEAD'
    2. Add the entry manually in the .gitconfig file itself. The same example can be written in the config file. Just add the below lines to the end of the config file if there is no [alias] tag in the file already, or if there is a [alias] tab already, add the alias as key value pair.


[alias]
last = log -1 HEAD

If you want the list of files that are committed, add the flag ‘–stat’.


[alias]
last = log --stat -1 HEAD


And the command you use to execute the alias is much like how you use other git commands.

git last

Also if you want to add an alias which takes a parameter, here is how to add git alias with a parameter.

Lets say we want to create a branch, and want to use a shorter command (‘cb’) instead of checkout.

you give an alias ‘cb’ with the actual command, wrapped in a function that takes a parameter.

[alias]
cb = "!f() { git checkout -b $1;}; f"

And you can execute ‘git cb {branch_name_you_want_to_create}‘ to create the git branch.

Feel free to provide comments/suggestions.

TroubleShoot: Table Not Found Spark-Submit

Ebates Coupons and Cash Back


When you know that a table exists in Hive / Impala, either because you created it, or you are able to query the table and view it’s data through UI or CLI, and also, you are able to query the table through pyspark or spark-shell, but then when you access the same table in spark-submit command, the application throws error ‘Table not found’, then the most likely cause is that

You are using sqlContext in your SparkContext [ SqlContext(sc)] rather than using HiveContext [ HiveContext(sc) ].

Change your code from SqlContext to HiveContext, and your code would be able to find the table again !!


Ebates Coupons and Cash Back

CamelCase to snake_case: python

Ebates Coupons and Cash Back


Given a value that’s in CamelCase (like a Java Variable Name pattern), and you want to change it to snake_case (python, perl, and maybe other scripting languages), here is the python function to do it.

def to_snake_case(given_value):
    import re
    s = re.compile('([A-Z])')
    return s.sub(r'_\1', given_value).lower().replace('__', '_').lstrip('_')

print(to_snake_case1(‘CamelCase’))
print(to_snake_case1(‘camelcase’))
print(to_snake_case1(‘CCamAAelCase’))
print(to_snake_case1(‘CCamel_Case’))

camel_case
camelcase
c_cam_a_ael_case
c_camel_case

If you want the Consecutive Capital Letters to be kept as one group, then a slight modification of the function will do.

def to_snake_case1(given_value):
    import re
    s = re.compile('([A-Z]+)')
    return s.sub(r'_\1', given_value).lower().replace('__', '_').lstrip('_')

print(to_snake_case1(‘CamelCase’))
print(to_snake_case1(‘camelcase’))
print(to_snake_case1(‘CCamAAelCase’))
print(to_snake_case1(‘CCamel_Case’))

camel_case
camelcase
ccam_aael_case
ccamel_case

If you want to give a list/array of values, and return all the values changed to snake case, here’s the modified function.

def to_snake_case(given_list):
    import re
    s = re.compile('([A-Z]+)')
    result = []
    for e in given_list:
        result.append(b.sub(r'_\1', e).lower().replace('__', '_').lstrip('_'))
    return result

print(to_snake_case2([‘CamelCase’, ‘camelcase’, ‘CCamAAelCase’, ‘CCamel_Case’]))

[‘camel_case’, ‘camelcase’, ‘ccam_aael_case’, ‘ccamel_case’]


Ebates Coupons and Cash Back


Install 3rd party Python Modules

When you have both versions of Python (2 and 3), and have ‘pip’ installed already in python, you can install the 3rd party python modules (e.g, bitstring module) with the below commands.

Make sure you replace your module name in place of bitstring

Python 3:

  1. Open the Terminal and ‘cd’ (change directory) to the bin folder of where python 3 was installed.
  2. Run the command ‘pip3 install bitstring

Python 2:

  1. Open the Terminal
  2. Run the command ‘pip install bitstring’

You may want to add ‘sudo‘ in the beginning of the command like ‘sudo pip install bitstring‘ (and enter your system password) if the earlier command errors due to insufficient privileges.

Simple Script for Fibonacci Series using Python

#!/usr/bin/python3
#Script to find Fibonacci Series up to a certain maximum number (say 100 for e.g.,) in Python 3
def main():
    a, b = 0, 1
    print(0, end = ' ') #If you want the older style fibonacci series, you can comment out this line
    while b <= 100:
        print(b, end=' ')
        a, b = b, a + b
if __name__ == "__main__": main()
Same Script in Python 2 Version

#!/usr/bin/python
#Script to find Fibonacci Series up to a certain maximum number (say 100 for e.g.,) in Python 2
def main():
    a, b = 0, 1
    print 0, #If you want the older style fibonacci series, you can comment out this line
    while b <= 100:
        print b,
        a, b = b, a + b
if __name__ == "__main__": main()

How to configure Aptana Studio with Python3 interpreter

Ebates Coupons and Cash Back

If you have installed Aptana Studio when you had Python 2 version, but now you have installed Python 3, here’s how you need to configure or add Python 3 Interpreter to Aptana.

Step 1: Find out where in your Mac is Python3 got installed. If you know the exact path, skip this step.

Open your  Terminal and Type ‘python3‘ or Open the IDLE gui that comes with python3 installation

Run the below commands

Python 1.png

Now you know the Path of Python 3. Copy the exact Path that got printed for you in the Terminal.

Step 2: Adding Python3 Path into Aptana

In Apatana  Studio Menu  Go to:

Aptana Studio > Preferences > PyDev > Python Interpreter

Click ‘New‘ and Provide Name and the full Path you copied, and Click OK

Python 2.png

Step 3: Pointing your project to Python3 Interpreter.

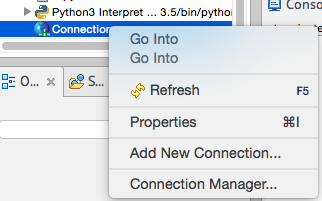
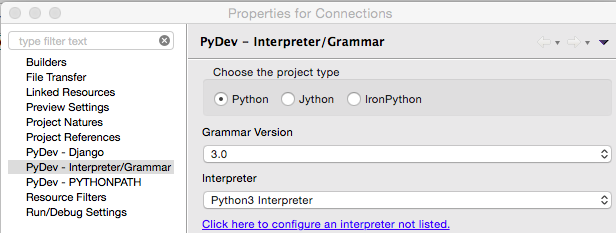
When you add a new or import project files/directory, you can see a ‘connections‘ icon. Right click on that and ‘Add new connection‘ or ‘ properties‘, and add/change it as needed.

Python 22.png

Choose the Grammer Version as 3.0

Usually the interpreter may be set to ‘Default‘ value, Change it to ‘Python 3 Interpreter‘ (or whatever the name you gave it in Step 2)

Python 3.png

Now you should be all set to run Python 3 scripts in Aptana Studio.

You can do a quick test, by adding a new file with one command

print “Hello”

And running this should throw you error in python3, because the proper syntax is with parenthesis.

print(“Hello”)

And this should run successfully.


Ebates Coupons and Cash Back

How to install pip for python

Mac comes with python installed by default. The version of python that gets installed as of this dated is 2.7

In 2.7 version, you don’t get pip – the tool that can be used for installed 3rd party python modules – installed by default.

Here’s how you install pip for python:

  • Open the ‘Terminal’ (in Applications –> Utilities )
  • And the type the command sudo easy_install pip – you may have to type in your system password if needed.